How to set-up an InDesign Document
To start with InDesign you need some background knowledge. The software is very complex and offers loads of functions. In this article we tell you how you set up guides, baseline grid and document grid or page numbering. I used InDesign CS5 for Windows in this tutorial.
Type area
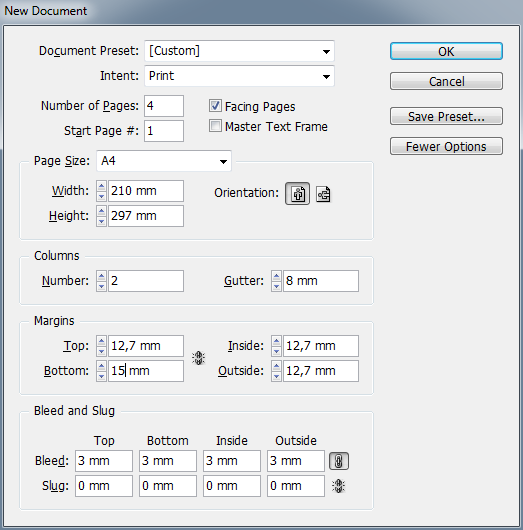
A new document is created via File > New or through CTRL+N. In the dialog window you enter your presets for format, columns and margins. Intent of most InDesign projects is print, so that’s what we go for here. For the first try we take 4 pages and select “Facing Pages”. Format will be A4 with vertical/portrait orientation.
The number of columns I set to two with a gutter of 8mm, which is the space between the columns. The margins define the distance to the edge of the page. By clicking the chain symbol you can enter values which vary between the boxes. To access the bleed set-up you need to click “More Options” in the Windows version. In the extended area at the bottom of the dialog box you should set bleed to 3mm. If you need these settings for further documents you can save them via “Save Preset …”
Guides
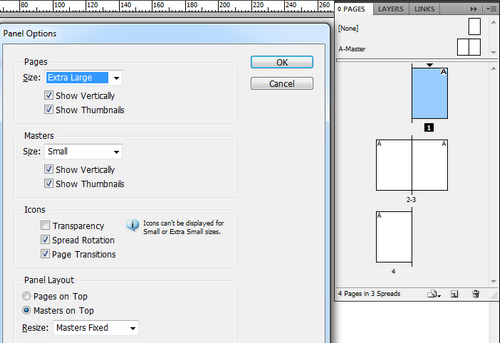
Clicking on Window > Pages (or Pages panel on right side) gives you an overview of the document. We recommend right clicking in the Pages panel to access the panel options where you should set Size to Extra Large. It gives you better orientation. In the previous steps we have set up the type area or print space. If the rulers are visible (View > Show Rulers) you can create guides by dragging them from the ruler to the desired position with the left mouse button pressed.
Hold CTRL while dragging to extent the guide across the spread. In the options bar you adjust the position with a numeric value for increased precision. Hold ALT to switch between horizontal or vertical lines. That makes it easier to position objects.
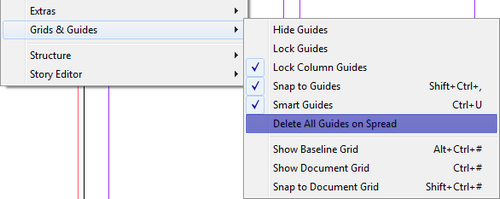
If the guide becomes obsolete you can simply drag it back to the ruler. If you need all guides removed go to the top menu and click View > Grids & Guides > Delete all guides on spread.
Smart Guides
One special feature are smart guides available through View > Grid & Guides > Smart Guides (active by default). They help in precisely positioning and arranging objects. If you, for example, drag open a new frame or move it around they show automatically to indicate certain alignments (center, even spacing, etc.) with the page or other objects.
When you copy and move the frame with SHIFT+ALT pressed, InDesign shows guides indicating object spacing. This works horizontally and vertically. A sort of magnetic pull also assists to find the exact fit when you have “Snap to Guides” activated.
Baseline Grid
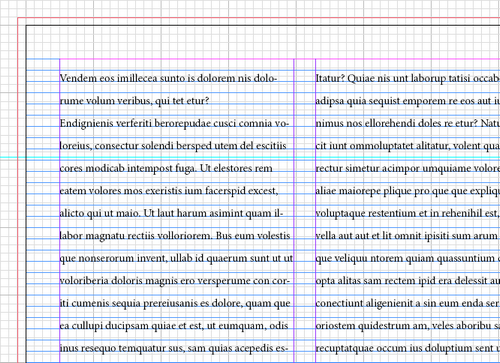
When layouting with InDesign the baseline and document grids are also quite helpful. With the baselines you can set all text to the same vertical orientation to get a consistent alignment across all pages. I assume that you have a document with text open in InDesign. If you need text right click in a text frame (create one with the Type tool from the lefthand toolbar) and select “Fill with placeholder text” to fill it with Lorem Ipsum text. To make the grid visible go to View > Grids & Guides > Show Baseline Grid.
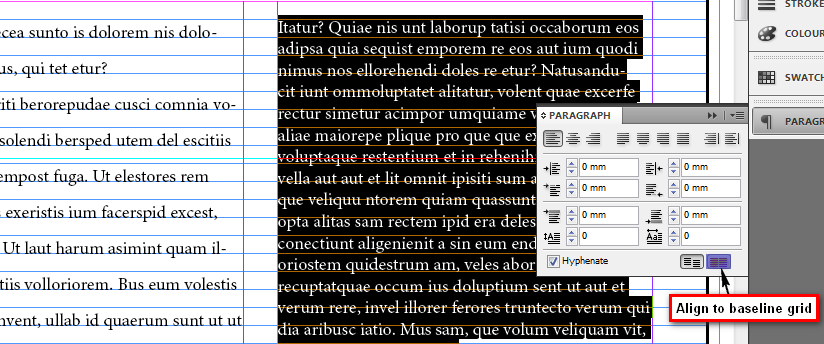
If the text isn’t already aligned to the baseline select the text with CTRL+A and open the Paragraph panel to align it to the baseline grid. The spacing of the baselines can be controlled in the Presets > Grid menu and the entry Start, which is a millimetre value. This can be adjusted to the page’s edge or the top margin we set in the beginning. By the way: the view threshold determines at which zoom factor the baseline grid becomes visible.
Document Grid
In support of the baseline grid you can also use the document grid, accessible via View > Grids & Guides > Show Document Grid. You now see a chequered texture across your document. With a click on “Snap to Document Grid” you can use the full potential of the grid. If you now open a new object frame it interacts with the grid, making precise arrangements no big deal.
To adjust the document grid to your print space click on Presets > Grid once again and enter suitable values in the Grid Line box.
Page Numbers
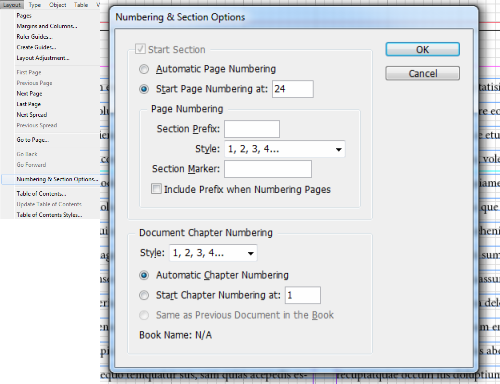
You can define the starting page number already when you set up a new document. In the pages panel your pages will be shown and numbered accordingly. When you create further pages InDesign of course adds new entries with correct numbering. If the document starts with an even page number InDesign automatically creates facing pages. In general you can use Layout > Numbering & Section Options to change the starting value of your page numbering.
Managing spreads
After creating a document with multiple pages you can mark specific pages with colour labels to easily tell them apart. For that you right click the page in your Pages panel and choose the desired colour from the Colour Label menu point. Depending on the content placed on a page it might be useful to rotate spreadview. Again right click on the page in the panel and select Rotate Spread to choose the angle. A rotated spread is labelled with a small icon to remind you of the applied action. If you zoom out the spread will also be shown with rotation in relation to the other spreads in your document. Via Rotate Spreadview > Delete rotation you cancel this action.
There obviously is a lot more we could write, tell and explain about this but this article mainly serves the purpose of giving beginners a basic overview to get on the go. There’s more to come in the future.









Fantastic post,bookmarked
Brilliant – thank you for this post – great!